From the Field: An Electrical Estimator Talks IntelliBid’s Interface
Article written by: Stephen Carr
This is the first of several articles I am writing to present the features of Conest Intellibid.
For those of you who are unfamiliar with electrical estimating software, it consists of two major elements. The first is the Database, which stores information for over 135,000 electrical components. That information, at a minimum, includes the price for each item and how long it takes to install; also known as the labor unit. The database also stores information on collections of components that are called Assemblies. An example of an assembly is a duplex receptacle; which may include a box, plaster ring, selected receptacle, a plate, supports, wire nuts, screws and your selected wiring method (MC Cable, BX, RX or EMT ½ or ¾).
The other major element of most estimating software is the Interface. The interface is what you see on the screen. While the interface has many functions, its primary job is to help you select material (items and assemblies) from the database to include in your estimate. The interface for Conest Intellibid has some great features I had never seen before I received a demonstration of this estimating system.
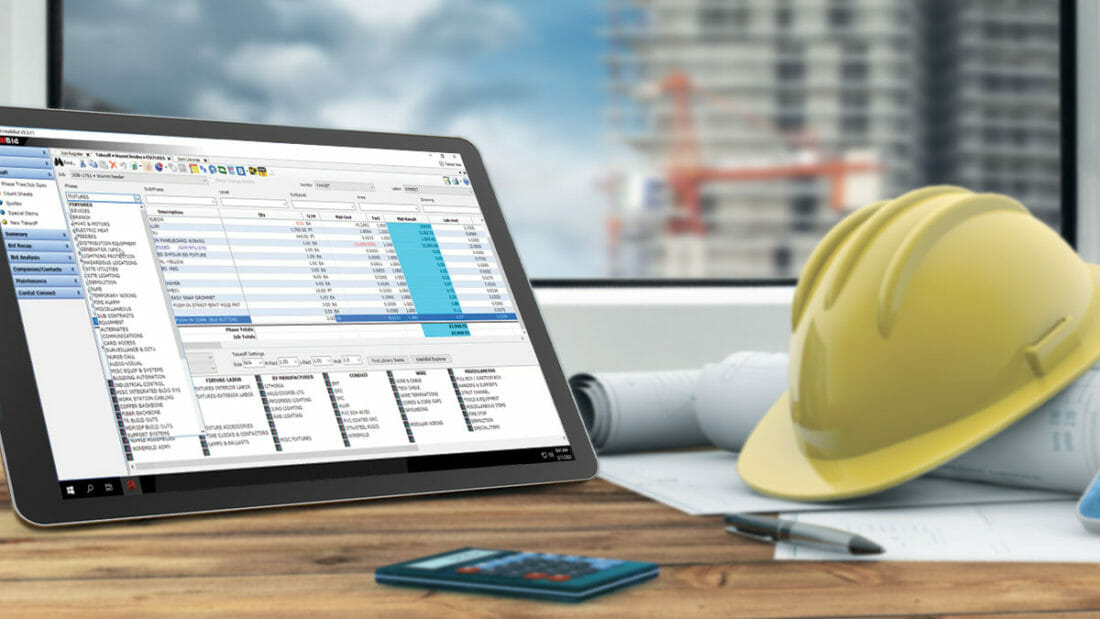
The first feature that got my attention is the audit trail, which dominates the takeoff screen. When inputting takeoff with my previous software packages, the information was not displayed when I hit the Enter key. With Intellibid, your input immediately appears on the audit trail. You can easily see if you have made any mistakes in your selection or your data entry. If you had entered information in error you can actually correct the item right on the screen. The quantity, material price, material factor, labor unit and/or labor factor can all be change with one or two clicks.
If you’re unsure you’ve selected the right item, right click on it, and select ‘View Item’. A dialog box pops up with all the information for the component, including manufacturer, catalog number, UPC Code, prices, and labor units. It may even have a picture of the item. Additionally, you can delete, cut, copy, and paste anything in the audit trail like the way a spreadsheet works. Amazingly, you can even copy audit trail items from one job to another.
The next feature that grabbed my attention is at the bottom of the screen. A box that is approximately a quarter of the screen height and extends across the bottom of the screen, is the window into the database. Its primary organization is called Libraries, such as Fixtures, Devices Flush, Switchgear and Fire Alarm. Within each library are many Catalogs. For instance, the Conduit and Wire Library contains catalogs for EMT, GRC, IMC, Aluminum, PVC, Supports, Wire, Cable Tray, and many others. Inside of each catalog are all the components needed for that Catalog. As an example, the EMT catalog includes the various sizes of EMT conduit, elbows, couplings, connectors, wire, hangers, strut, conduit bodies and more. The library and catalog features are simply the most well-organized window into an electrical estimating database I have ever used.
Of course, there’s more to the libraries and catalogs. IntelliBid is the only system I have ever used which allows a user to reorganize or add material to a catalog. You don’t really need to modify anything in the libraries, because the way they are presented from Conest is very well organized and complete. However, most of the estimators I have worked with are particular about the way they do things. This electrical estimating package allows the user to change the system in a several ways. Users can arrange things the way they like, instead of being forced to do things the way the programmers want it done. For instance, I like inputting an EMT feeder in a certain order: conduit, elbows, couplings, connectors, supports and wire. I was able to reorganize the catalog to my liking in about five minutes, using simple cut and paste methods.
The third feature I like is called Comments. It only takes two mouse clicks to append or insert a comment anywhere in the audit trail. After the comment is created, you can add any text you want. For me, this feature meant the end of reviewing the estimate for project management six months later and asking, “Why did I take it off that way?” I can use comments to explain in detail any unusual items in the audit trail. I also use the comments feature extensively to explain the takeoff that follows a comment. For example, a comment might be “Required per Note 3, Plan Sheet E4.04.”
Of course, the Interface has more functions than inputting your takeoff. There is a menu structure on the left side that allows you to navigate to the other parts of the program such as the summary, recapitulation, and maintenance. Across the top of the screen is a row of icons that launch other features such as undelete, breakouts, substitutions, job viewer, collapse/expand assemblies and links to pricing services.
That’s it for now. In future articles I will explore more of how Conest Intellibid works, including the features of the database, assemblies, material pricing, summary screen, recapitulation, and many of the other parts of the program.