
When you open IntelliBid’s Bid Recap screen, the first thing you see is the Top Sheet. This page provides an overview of key bid values for easy reference. What many users don’t realize is that, not only can the Top Sheet be customized to display almost any information you want, it can also be used to generate a customized Bid Report.
Custom Bid Report
Open one of your recent jobs in IntelliBid and go to the Bid Recap screen. Note the layout of the Top Sheet. Now go to the Reports menu at the top of the screen and select Bids > Bid Top Sheet. The report exactly mimics what you see on the Top Sheet. This means that you can design your own Bid Report simply by setting up the Top Sheet accordingly. The Top Sheet cannot be modified within a Bid, so we will be editing the Bid Template instead. These changes will apply to all of your future Bids.
Note: Before we continue, we must stress that you should always make a backup of your master database before making even minor changes to your Bid Template. You may even want to consider making a copy of your Bid Template and modifying that instead.
This is how it’s done:
1.) Go to the Maintenance menu and select Bid Templates (remember to click Yes when prompted to backup the database).
2.) Click the Copy button at the top center of the screen.
3.) Select the Bid Template you wish to Copy from the dropdown menu and give it a name and click OK.
4.) At the top center of the screen is the Top Sheet button. Give it a click. The Top Sheet screen opens, displaying the current layout for the template.

The Top Sheet Component list on the left, displays the components that you want to include in the Top Sheet of the bid. Items are added and removed using the Add, Insert and Remove features by right clicking on any line in the grid:
5.) The Add feature adds a blank line to the end of the component list. Scroll to the bottom of the list (using the scroll bar) and double-click in the Description field and type the new component label.
6.) The Insert feature will put a line in the component grid above the line where your cursor is currently placed.
7.) The Remove feature removes the line where your cursor is placed in the Component grid.
8.) Close will save your changes and close the Top Sheet screen.
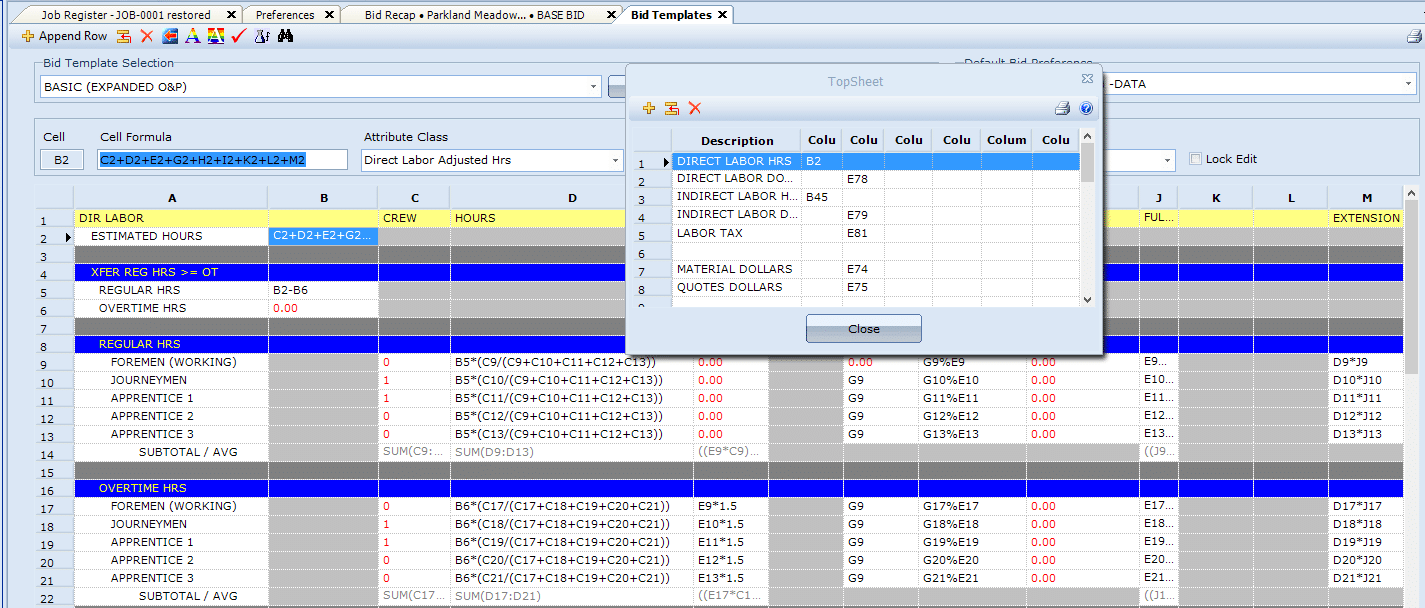
The title bar displays the template you are viewing, in this case BASIC (EXPANDED O&P). Double-click in any field you want to change and type your changes. The Description column should be a descriptive label for the value(s) in
Column 1 and Column 2. These two columns contain the cell references in the Bid Template where the value for this cell will come from. Cell references are standard spreadsheet notation using the column and row similar to Microsoft Excel.
For example, the DIRECT LABOR HRS (first description line) in this illustration is from cell B2, or column B and row 2. Look at the Template grid below the Top Sheet dialog and click in cell B2 (move or close the Top Sheet dialog if it’s in your way). You can see that B2 has a formula for the value of ‘Estimated Hours’ (C2+D2+E2+G2+H2+I2+K2+L2+M2). Notice the Cell and Cell Formula boxes above the grid. The cell that is selected is displayed in the Cell Box and the formula in the Cell Formula box. This makes it easier to read and edit the formula. Make edits to the formula in the Cell Formula box if you need to.
Once you’ve completed your layout with new Descriptions and cell references, close the Top Sheet window and exit Bid Template Maintenance. Create a new Bid in your job using the updated Template and confirm that your Top Sheet looks correct with the information you want pulled from the cells in the template. Now print the Bid Top Sheet report, and the new layout will appear there as well.